
This tutorial will show you how to install WordPress using the popular LAMP stack (Linux, Apache, MySQL, PHP) on a Vultr VPS running Ubuntu 16.04. You can follow along whether you rent a VPS or cloud server from Vultr, DigitalOcean, Linode or any other host since the steps are much the same for a standard Ubuntu 16.04 server installation.
Note for the lazy: Many VPS providers offer a One-Click WordPress install option, which is not what this tutorial is about. You’re going to learn how to manually set up WordPress with LAMP step-by-step, including the bare-bones Ubuntu VPS server it will run on.
At the end of this VPS hosting guide, you will be rocking your own self-hosted WordPress site for blogging, e-commerce, or whatever you wish.
Contents
Step 1 – Spin up a new Vultr VPS
For our tutorial example, we will use a $2.50 / month VPS from Vultr with 512 MB RAM and 20 GB SSD storage, but you can use any size or type of VPS with Ubuntu 16.04 Server. The $2.50 option is recommended only as a ‘sandbox’ plan, while the $5 option with 1024MB of RAM is more than suitable for most WordPress websites.
Keep in mind that 512MB of RAM is considered low when running WordPress on a LAMP stack, so don’t go lower or you’ll have performance issues when your website gets popular.
You can spin up a new VPS instance as soon as you have added credit to your hosting account.
This is what the VPS creation page looks like on Vultr.
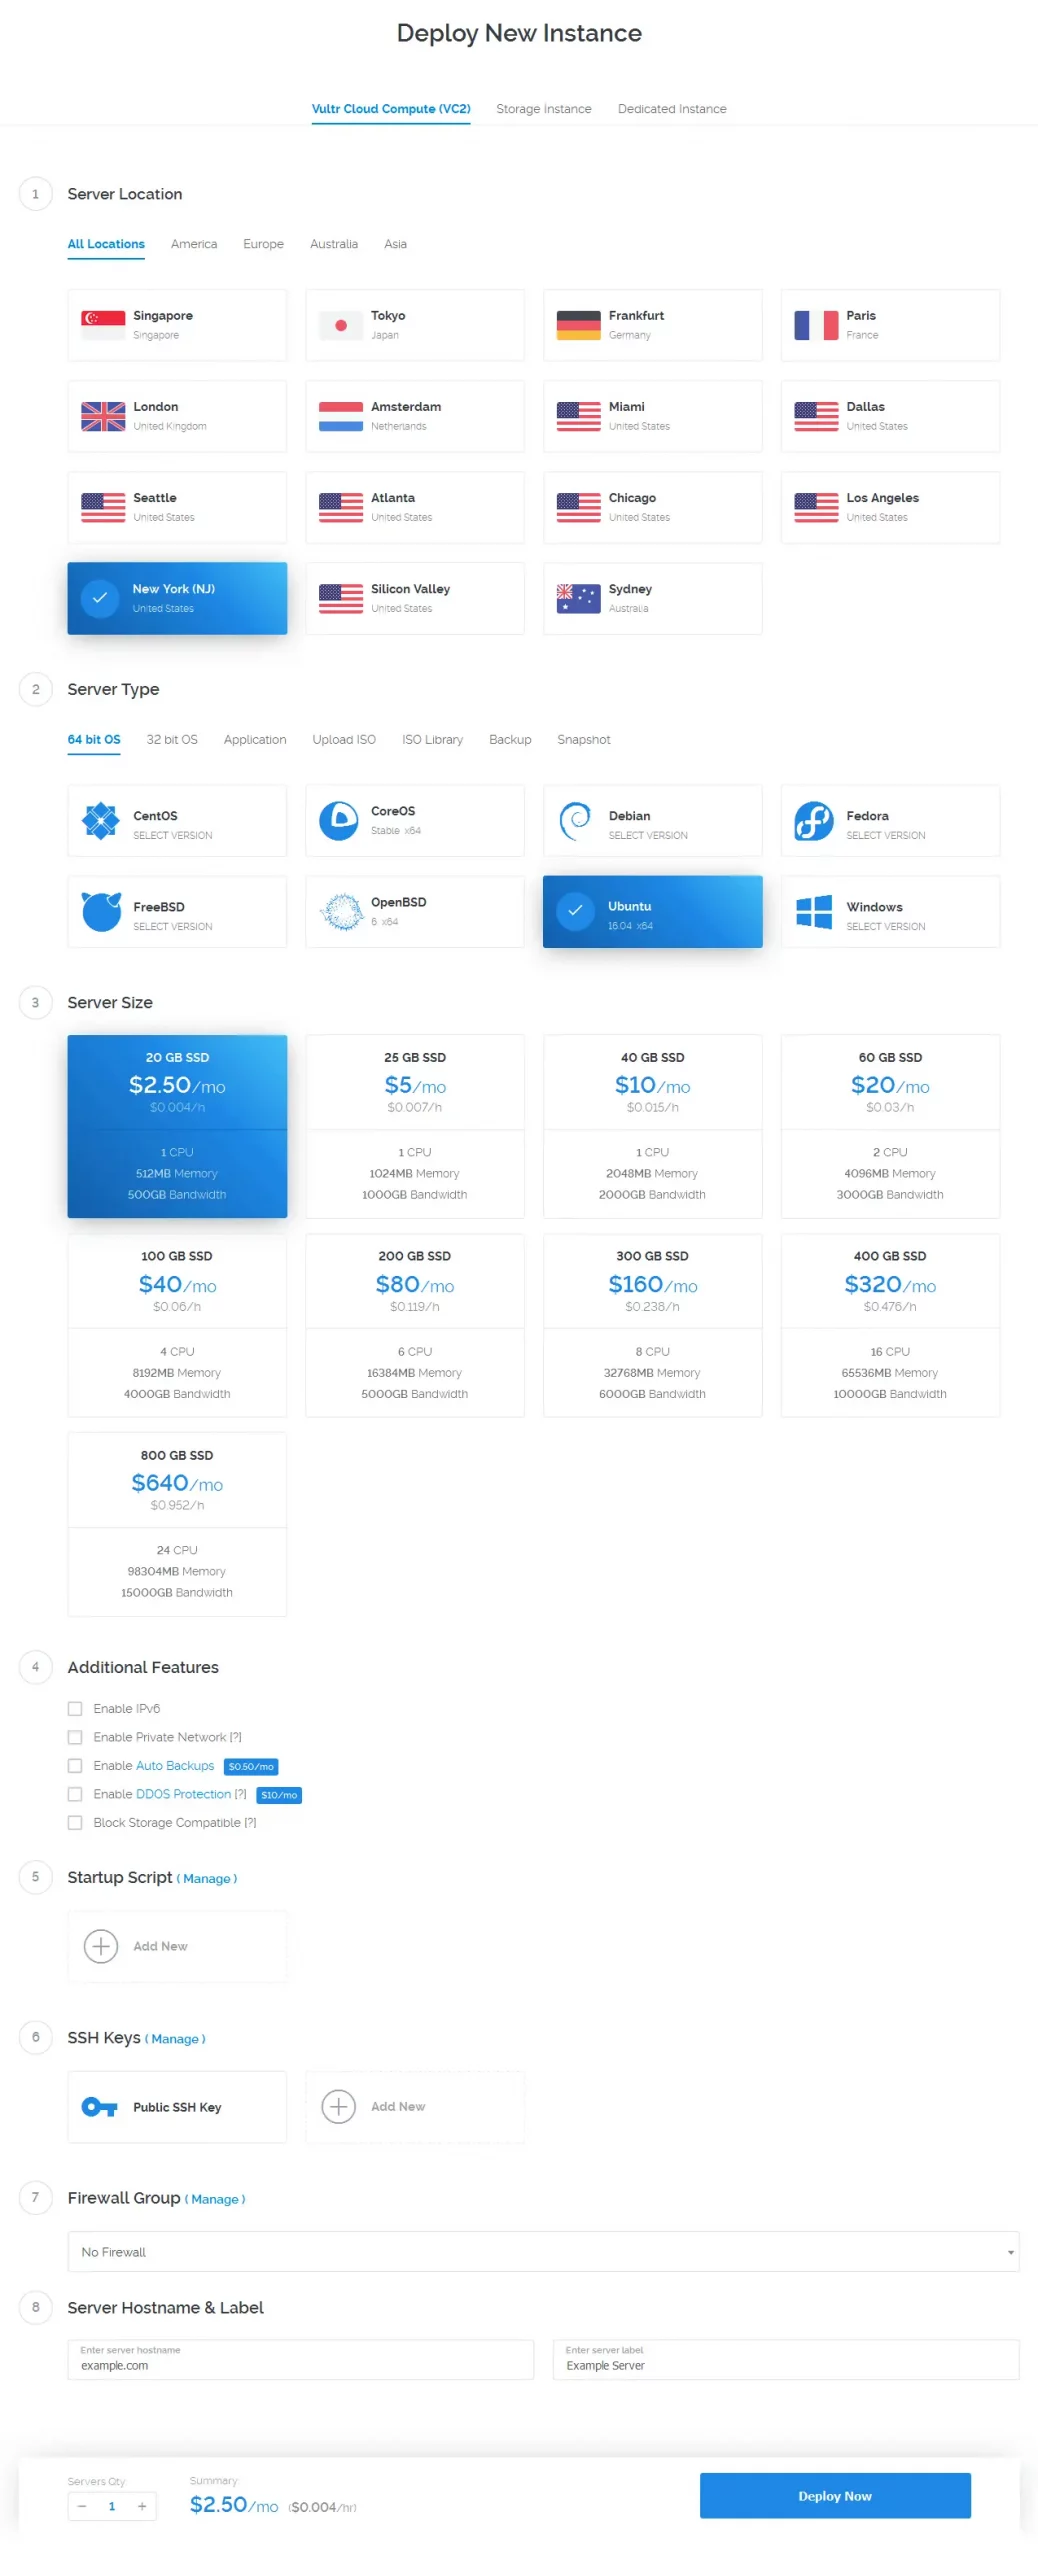
Here’s what the options mean, and what you should choose for a standard Ubuntu 16.04 VPS setup:
- Server Location: Select where you want the server to be located. If your site’s main audience is in the US, choose an American server to keep things speedy for your visitors.
- Server Type: For your server operating system, choose 64 bit OS > Ubuntu 16.04 x64.
- Server Size: You can upgrade your server size later, but not downgrade, so choose the smallest option since you are starting out with a new WordPress site from scratch. At the time of writing, only New York, NJ and Miami locations at Vultr support the $2.50/mo VPS server size. Other locations are temporarily sold out.
- Additional Features: Here you can select extra features for custom requirements. It is safe to leave them all unchecked if you’re not sure, although Auto Backups is recommended if you can afford it.
- Startup Script: This option lets you add scripts to be run when your VPS first goes online. You don’t need to manage scripts for this WordPress install as we will be setting up everything by hand.
- SSH Keys: You should select your public SSH key here for password-less login. See how to generate SSH Keys and save your public key now. Keep your private key safe on your PC, as you will be using it soon to log in.
- Firewall Group: The Vultr Firewall enables you to drop traffic before it reaches your VPS server, however we will configure the server firewall later using UFW. Leave unchecked.
- Server Hostname & Label: For Server Hostname, enter your domain name or a descriptive subdomain – e.g. example.com or server.example.com – and for Server Label, enter anything you like – e.g. My Server.
When you are happy with all the options selected, click Deploy Now.
A minute later and your Ubuntu VPS is online!
Step 2 – Log in to your Ubuntu 16.04 VPS using SSH
Windows users: SSH login via PuTTy
Windows users must download a tool called PuTTy (Official Site) to communicate with the Ubuntu VPS and tell it what to do. You will be using Linux commands to remotely configure your server, which you’ll learn as you go along. For now, you just need to copy-paste with care.
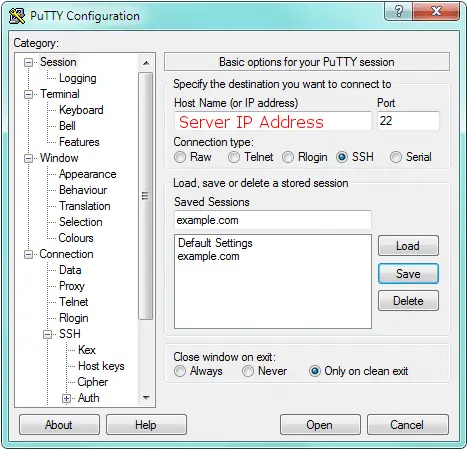
To log in to your server, you will need the IP address of the VPS, which can be found in your hosting dashboard.
Load PuTTy now and enter the IP address of your VPS under “Host Name”. Leave the Port as 22.
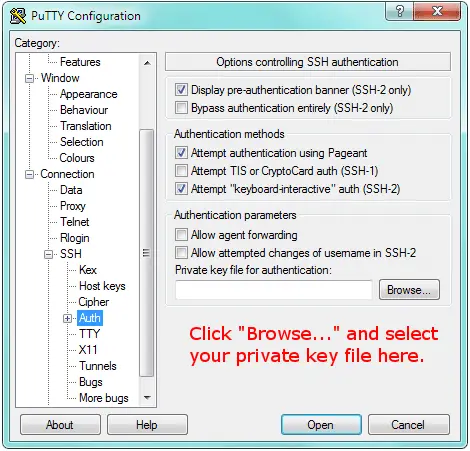
Then, navigate to Connection > SSH > Auth and add the private key file (.ppk) that you generated with PuTTygen during Step 1.
Important: If you did not add a public SSH key before spinning up your VPS, then you will have to use normal password authentication with root. See the Vultr VPS dashboard for your root password, or check your email inbox.
Click the Open button on PuTTy to connect to your VPS.
Select “Yes” when asked about adding the host key to the cache. Now type root at the login prompt and press Enter.
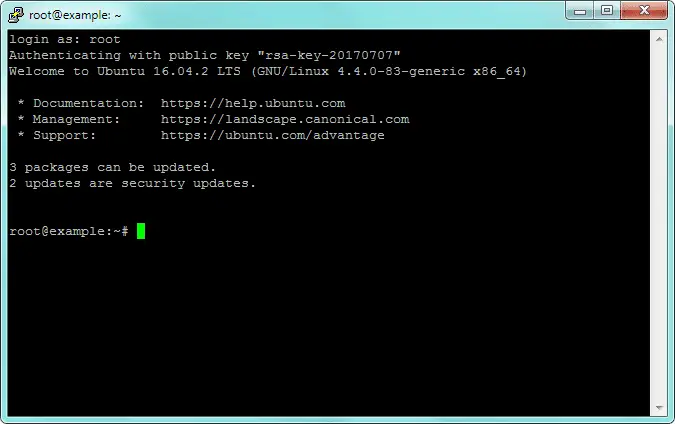
Congrats, you’re now logged in to your VPS as root!
You can continue to step 3, where you’ll type or copy-paste Linux commands into the PuTTy server console.
Linux users: SSH login via terminal
On Linux, you can SSH straight into the VPS from a new terminal with OpenSSH. Simply move your private key to the .ssh folder in your home directory and rename the file as “id_rsa” so that OpenSSH will find it.
To do this, open a new terminal and type:
mv /path/to/your/keyfile ~/.ssh/id_rsaNow, protect the key file with read-write permissions for your user only. If you skip this step, you’ll get a “Permissions Too Open” error from OpenSSH:
chmod 600 ~/.ssh/id_rsaFinally, you can log in by typing:
ssh root@server_IP_addressYou may now continue to Step 3.
Step 3 – Add non-root superuser and copy SSH keys
The root user in Linux is like a super administrator, with the power to do anything it wants on the system. Using your VPS as root can be dangerous, because one mistyped command can spell doom for the server and its files.
To protect your server from both yourself and hackers, we want to create a new superuser with root rights and then disable root login completely.
Tip for copy-pasting into PuTTy: To paste text from your browser into a PuTTy console window, first highlight the text, press Ctrl + C, and then right-click anywhere in the PuTTy window area.
You can add a new user by typing in the server console:
adduser myuser… where myuser is your chosen username, which can be anything you want. Once you’ve entered a new password, you can skip the rest of the questions by pressing Enter.
Now, we want to add myuser to the sudo (superuser) group, giving your user account root privileges:
usermod -aG sudo myuserBefore we exit root and log in with our new sudo user, let’s first add the SSH keys for the root login to our new user’s SSH directory. This will enable you to log in with the new user using your existing private SSH key.
Type or paste the following (remember to replace myuser with your username).
Make the hidden .ssh folder in your home directory:
mkdir /home/myuser/.sshCopy all files in root’s .ssh folder over to your user’s .ssh folder:
cp -rf /root/.ssh/* /home/myuser/.ssh/Because you’re using root to copy the files, you have to change ownership afterwards from root to your user:
chown -R myuser:myuser /home/myuser/.sshTo verify that everything copied correctly, list all files in the .ssh folder by typing:
ls -la /home/myuser/.sshYou should see a file called “authorized_keys” with myuser displayed twice. This file contains your public SSH key, owned by myuser in the myuser group with rwx permissions (read/write/execute) for your user.
Finally, we want to exit from root so we can log in with our new user and configure Ubuntu to install LAMP and WordPress. To exit, type:
exitIf you’re using PuTTy, reload PuTTy and enter your new username in Connection > Data > “Auto-login username”.
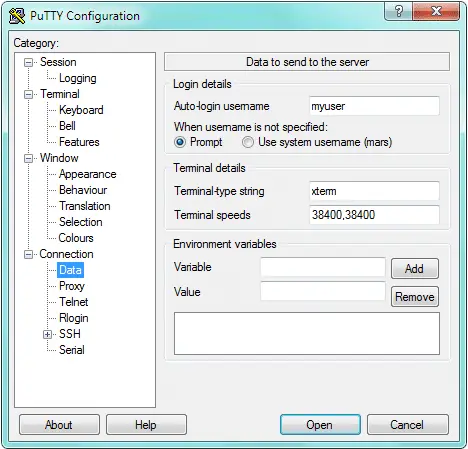
Tip for connecting with PuTTy quickly: Once you have 1) set your server IP in the Host Name field, 2) set your private key file for authentication, and 3) set your Auto-login username, you should save these settings by adding a new session name in Sessions > “Saved Sessions”, and then clicking Save.
Now, whenever you want to log in to your Vultr VPS, you select your saved session, click Load, and then click Open to connect.
If you’re on Linux, simply SSH back in by typing on your local terminal:
ssh myuser@server_IP_addressStep 4 – Upgrade and secure Ubuntu 16.04
Your Vultr VPS is almost ready to install WordPress and LAMP. But first, we want to make sure that it is running the latest base packages and security upgrades. To do so, log back in to the VPS with your newly-created sudo user and type the following:
sudo apt-get update && sudo apt-get upgradeSelect Yes at the console prompt and Ubuntu will update the software list and upgrade any outdated applications.
Disable root login and turn off password authentication
You need to lock down your VPS so that no one (not even you) can log in as root using SSH.
In the console, type:
sudo nano /etc/ssh/sshd_configThis will open the SSH configuration file with the nano text editor. Using the arrow keys, scroll down until you find:
PermitRootLogin yes… and change the “yes” to “no” so it looks like this:
PermitRootLogin noNow, if you set up your SSH keys correctly and are using SSH to log in, you want to disable PasswordAuthentication.
NOTE: if you are not using public/private SSH keys to log in, do NOT disable PasswordAuthentication or you won’t be able to log back in.
In the same sshd_config file, find:
#PasswordAuthentication yes… and remove the leading “#” symbol to uncomment the line, then change the “yes” to “no”. It should look like this:
PasswordAuthentication noTo save the changes to the file, hold in Ctrl and press O, then press Enter. To exit the nano editor, hit Ctrl + X.
Enable the firewall with UFW
To secure our server with a firewall, we’ll use UFW (Uncomplicated Firewall) which is installed with Ubuntu by default. However, it is not active by default, so we’ll set two quick rules for allowing SSH and HTTP and then enable it to block all other incoming traffic.
Type the following to add SSH traffic (port 22) to the allow list so that we can still log in later:
sudo ufw allow 22And since you will be serving HTTP pages from WordPress, you must also allow port 80 by typing:
sudo ufw allow 80Check that your UFW firewall rules have been added correctly:
sudo ufw status verboseIf you see ports 22 and 80 set to ALLOW, then you can safely enable the UFW firewall by typing:
sudo ufw enableStep 5 – Install Apache2
Apache is a free and open-source web server application that sends pages to your visitors’ browsers.
Install Apache by typing:
sudo apt-get install apache2When Apache has finished installing, you can verify that it works correctly by typing:
hostname -IThis command will display your Vultr VPS’s IP address, which you can now copy and paste into your browser like this:
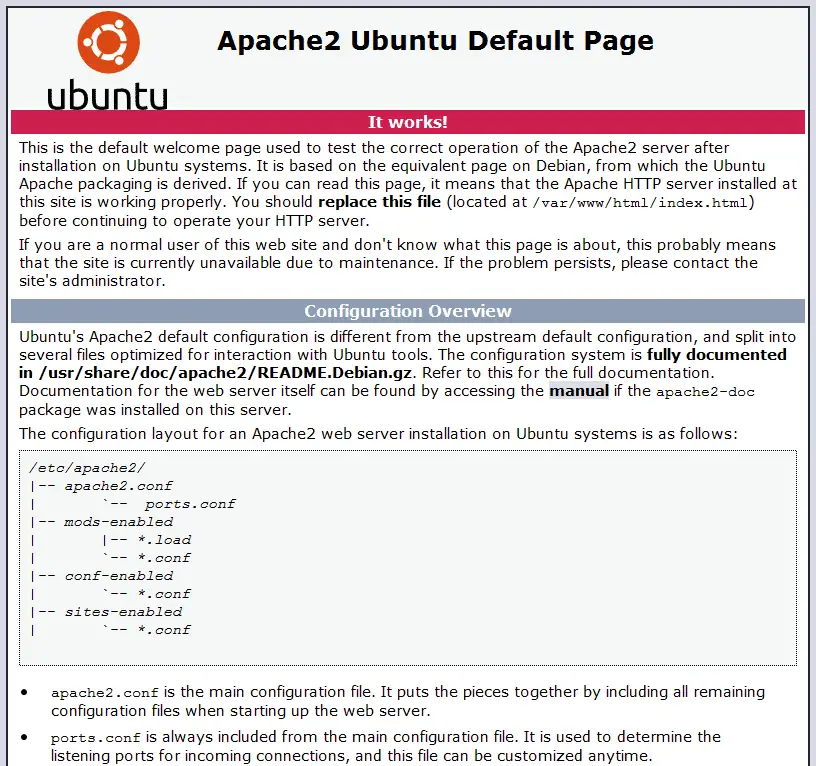
http://server_IP_addressPress Enter in your browser and if your Apache is working you’ll see a simple webpage with text saying “It works!”.
Step 6 – Install MySQL
Now you can install MySQL. The apt-get command below will install MySQL as well as the MySQL packages for PHP.
sudo apt-get install mysql-server php7.0-mysqlChoose a strong password for your root MySQL user. This will be the main database administrator account with which you can manage your databases and run SQL queries.

When the MySQL installation is complete, you should run the following command to improve security:
sudo mysql_secure_installationType Yes or Y at each prompt, except for the question that asks to change the MySQL root password.
Step 7 – Install PHP 7
You can install PHP 7.0 with the following command:
sudo apt-get install php7.0 libapache2-mod-php7.0 php7.0-cgiTo test whether PHP is working correctly, create a new PHP file in your public html directory with nano:
sudo nano /var/www/html/info.phpCopy the following PHP code snippet into the file:
<?php
phpinfo();
?>
… and save the file by pressing Ctrl + O, then hitting Enter. To exit nano, press Ctrl + X.
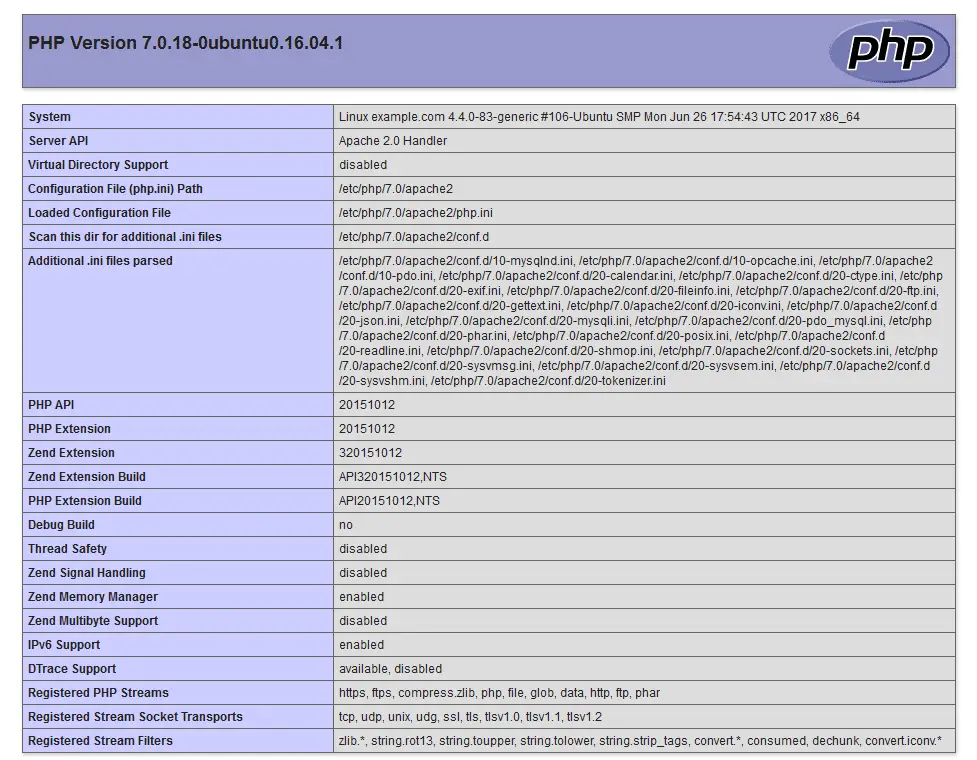
Check that the PHP file works by typing into your browser:
http://server_IP_address/info.phpYou should see a page that looks like this:
You can (and should) remove the info.php file by typing:
sudo rm /var/www/html/info.phpStep 8 – Install WordPress
Woohoo! Nearly there. Now we just have to download and configure WordPress.
The /var/www/html folder is the public web directory, so any files you store here will be accessible to anyone. This is where we are going to install WordPress.
Navigate to the /var/www/html folder by typing:
cd /var/www/htmlDelete the default index.html that comes with Apache:
sudo rm index.htmlNow you can use wget to download the latest WordPress package:
sudo wget -c http://wordpress.org/latest.tar.gzOnce it is downloaded, use the tar command to extract the files:
sudo tar -xzvf latest.tar.gzCopy all the files from the wordpress folder into the /var/www/html folder by typing:
sudo cp -r wordpress/* /var/www/htmlRemove the unneeded wordpress folder and the WordPress install package:
sudo rm -r /var/www/html/wordpress && sudo rm latest.tar.gzEverything is currently owned by the root user because we used the sudo command to download and copy the files. So, we need to change ownership of the WordPress files to www-data, which is the Apache user:
sudo chown -R www-data:www-data /var/www/html/We should also set the correct permissions for every file and folder in the WordPress directory:
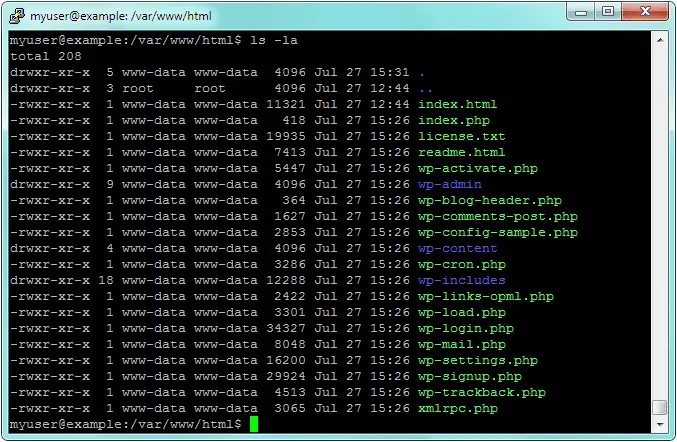
sudo find /var/www/html/ -type d -exec chmod 755 {} \;sudo find /var/www/html/ -type f -exec chmod 644 {} \;To verify that your permissions have been set properly, use the ls -la command:
Now you want to set up a MySQL database for your WordPress site. At the console, type:
mysql -u root -pEnter your MySQL root password (the one you set when installing MySQL) and you will be logged in to the MySQL CLI, shown as mysql> at the console prompt.
You will need to enter the following, replacing wp_mywordpress (the database name), your_username_here and your_password_here with your own chosen values.
CREATE DATABASE wp_mywordpress;
GRANT ALL PRIVILEGES ON wp_mywordpress.* TO 'your_username_here'@'localhost' IDENTIFIED BY 'your_password_here';
FLUSH PRIVILEGES;
EXIT;
Once you’ve added your new database, you want to rename the wp-config-sample.php to wp-config.php:
sudo mv wp-config-sample.php wp-config.phpNow open wp-config.php with nano:
sudo nano wp-config.php… and enter the MySQL database details you chose above for DB_NAME, DB_USER, and DB_PASSWORD respectively.
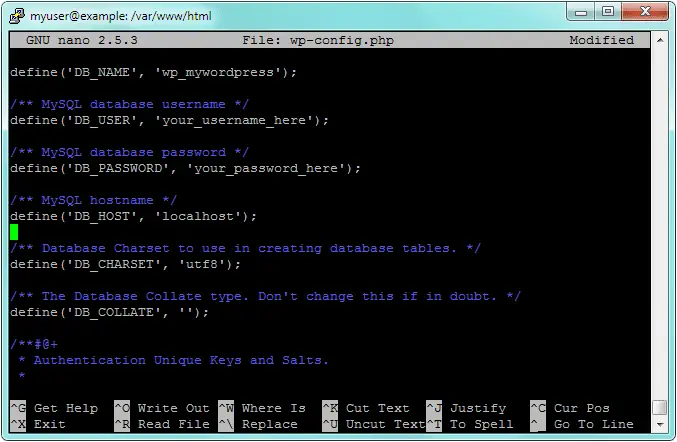
While you’re editing wp-config.php, you should also set your keys and salts in the section called Authentication Unique Keys and Salts.
WordPress offers a convenient generator for this purpose. Open the WordPress Secret Key Generator in your browser and copy all the lines.
They should look something like this (these are examples, do not copy them):
define('AUTH_KEY',         '-|2t:FV2o{CW~D_TGAgHfFWX4NnF%].z 2~8c.PaY/S%EX!fvm|vlX5NBpXT]4[V');
define('SECURE_AUTH_KEY',  '-<-jS5$ |BF)yw^qhRyL>K!_xo-#S|qr`.s U[iya|58k%?m36^!4iLr,|kUWg}o');
define('LOGGED_IN_KEY',    '0b.cKG1%cIf|mWMMLfe+R|FGd0i= m--xnb8@*sbhZ7|0s04s[d(ac+O@bMW<[g<');
define('NONCE_KEY',        '?K&C_=Dd5o7+Q{pdsl+]=~H4;~A@L:cQ6Pwv<w*g u="" q<jt<="SiCMr+lvyZJsW4y');" define('auth_salt',="" 'u+:vn(w$mh{]&cw){(gm_ltl0(36xv+-t+z,--n7{u="">Mfh+#K-HQziS%y-!f6h{1');
define('SECURE_AUTH_SALT', 'zx9X,]]Z,?&VpFZP }2?G;Dn)eJ-y]={N8>-:Ioh]BFlMaDx|2I6l+]3C[pd-~]{');
define('LOGGED_IN_SALT',   'Q-ALrMyVyO#jx*wQeE]( ^-J79W:JqF};:}-{~d&1/rey5zyC#A+mfY1k~(}8%}`');
define('NONCE_SALT',       'SF9(C[p4{T%j$jTC@H9#x:=s_+gyq16oL8-q&C)H.d4Gasqnhh(uvt1T-knx$^[u');</w*g>
Paste your own randomly generated lines into the wp-config.php file and remove the duplicate lines that include “put your unique phrase here”:
define('AUTH_KEY',         'put your unique phrase here');
etc...
Save the file with Ctrl + O followed by Enter to confirm. Exit back to the console with Ctrl + X.
Restart Apache and MySQL now so that we can safely finish the WordPress installation through our web browser.
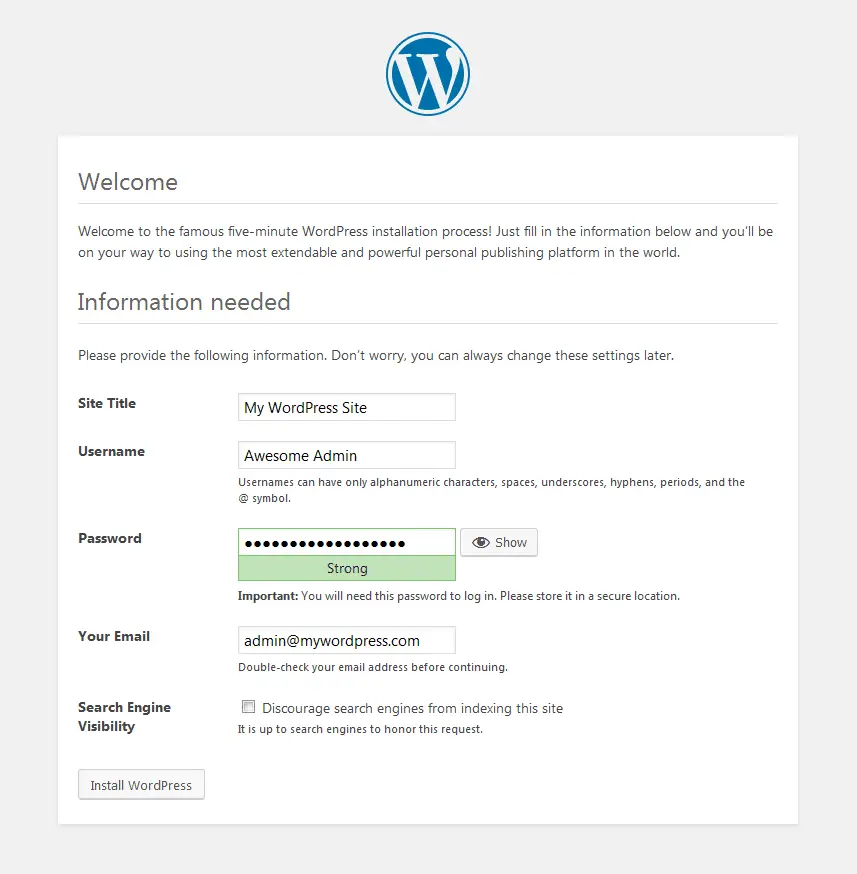
sudo service apache2 restartsudo service mysql restartOpen your web browser and point it to your server’s IP address, like this: http://server_IP_address
Select your language and you will be greeted with the WordPress Installation Welcome page. Fill out the information and then you can click Install WordPress.
 Congratulations, your new WordPress site is ready to roll!
All that’s left is to point your own registered domain name to your Vultr VPS IP address so that anyone who enters your domain name into their browser (e.g. “http://mysite.com”) will find your site. You don’t want to send people to an IP address, do you? That’s where the Domain Name System (DNS) comes in useful.
For help on setting DNS records, see this tutorial: How to Point a Domain Name to Your Vultr VPS. You may also want to see these Apache VirtualHosts examples for the correct server-side configuration of your domain name.
This concludes our complete WordPress + LAMP setup for an Ubuntu 16.04 VPS, but your journey has only just begun. What’s next? Customize your site’s look and feel with a nice theme, add some plugins for security and extra functionality, and have fun creating and sharing with WordPress.

Tom Davis is a technical contributor at TechWombat. He enjoys writing on IT, open source, electronics, and other geeky arcana. Tom’s always happy to reply to comments and corrections, so be nice and send him your thoughts at tomdavis@techwombat.com or in the comment section below.
Hello,
Thanks so much for your tutorial, it’s quite detailed for newcomer.
I met a problem in the end as I did as your tutorial step by step.
My website shows this in the front.
<?php
/**
 * Front to the WordPress application. This file doesn't do anything, but loads
 * wp-blog-header.php which does and tells WordPress to load the theme.
 *
 * @package WordPress
 */

/**
 * Tells WordPress to load the WordPress theme and output it.
 *
 * @var bool
 */
define('WP_USE_THEMES', true);

/** Loads the WordPress Environment and Template */
require( dirname( __FILE__ ) . '/wp-blog-header.php' );
I searched for such problems while I didn't know how to solve it.
Hi,
What’s happening here is that your index.php file in /var/www/html (your main WordPress directory) is not being served as a PHP file. Your server thinks it is a text file or normal HTML, so it just shows the plain text.
I don’t know what steps you took after you installed WordPress, but here are some common causes of this problem.
1) The rewrite module might not be enabled. You can try re-enable it with this command:
sudo a2enmod rewriteThen restart Apache:
sudo service apache2 restart2) Your WordPress .htaccess file (which contains the index.php rewrite instructions) is not overriding the Apache defaults.
Insert the following code block in the file /etc/apache2/apache2.conf:
Then run
sudo a2enmod rewriteagain and restart Apache.3) Your Apache might need to be told to serve index.php in your root WordPress folder.
To do this, open your .htaccess file:
sudo nano /var/www/html/.htaccessAdd this line at the very top:
If none of the above 3 suggestions work, feel free to explain any further steps you took after WordPress was installed.
Hello Tom,
Thanks so much for your kindly reply.
I guess some mistake happened when I was installing PHP 7,only I couldn’t tell what it really was.
Anyway I deployed a new server and tried from a fresh start, everything works!!
Thanks again for your tutorial.
I found this post helpful. You explain everything in details. Thanks you.
I have a question. How can I change my site url like http://example.com to https://example.com without using plugin. Right now I’m using cloudflare flexible ssl plugin. I tried search & replace plugin. but failed.
Thank you
The Search and Replace plugin will change the existing links found in your database to HTTPS links, but you also need to do two other things (at least, depending on your setup / hosting):
1 – Change your “WordPress Address” and “Site Address” URLs in Settings > General from http://example.com to https://example.com
2 – Tell Apache to rewrite your HTTP URLs to HTTPS URLs by adding the appropriate rewrite rules to your .htaccess file. Look up how to do this for your site on Google. There are a few different ways and you might have to try a couple before getting it right.
You will also want to disable any caching plugins until you’re sure that HTTPS is working.
Thank you sooooo much for this tutorial. It saved me lot of time.
10x times better than Vultr official tutorials which don’t work at all 🙂
That was easy thanks for the great explaination
that’s what I’m searching for !! thank a lot Tom Davis
Thank you very much for the detailed article! much appreciated
Really good details… mostly they never told you how to spin up server in the first step.
And will you recommend SlickStack script for install LEMP or step-by-step is safer? Thanks for your time and effort.
At a glance, SlickStack looks professional though I can’t speak for its safety. Just make sure you go over the documentation so you know what it does. Step-by-step is usually safer when it comes to troubleshooting because you will have a good idea of how the server is configured overall.
ALSO check this = How to install Apache, MySQL, PHP on Ubuntu fast on Vultr
—
https://keithrainz.me/how-to-install-apache-mysql-php-on-ubuntu-fast-on-vultr/
This is a great tutorial. Thanks a lot.