
This tutorial will show you how to point a domain name to your Vultr VPS using Namecheap’s DNS control panel as a visual example. If you only have a couple of sites to manage, it is recommended to use your domain registrar’s built-in DNS tool rather than try to run your own nameservers.
Since all registrars use the same overarching system (i.e. DNS) to map IP addresses to domain names, the DNS settings in this guide will work regardless of where you registered your domain.
Promo for 2024: Sign up with Vultr here and get $100 free credit!
Contents
What you need to know
The Domain Name System can be tough to get your head around, what with all the “CNAMEs” and other strange new terms you will encounter. However, setting up your DNS records is easy enough once you know the basics.
When you register a domain, you get two things with it:
- The domain itself, and;
- The domain’s DNS Host Records… which you, as owner (in the sense of paying registrant), can edit.
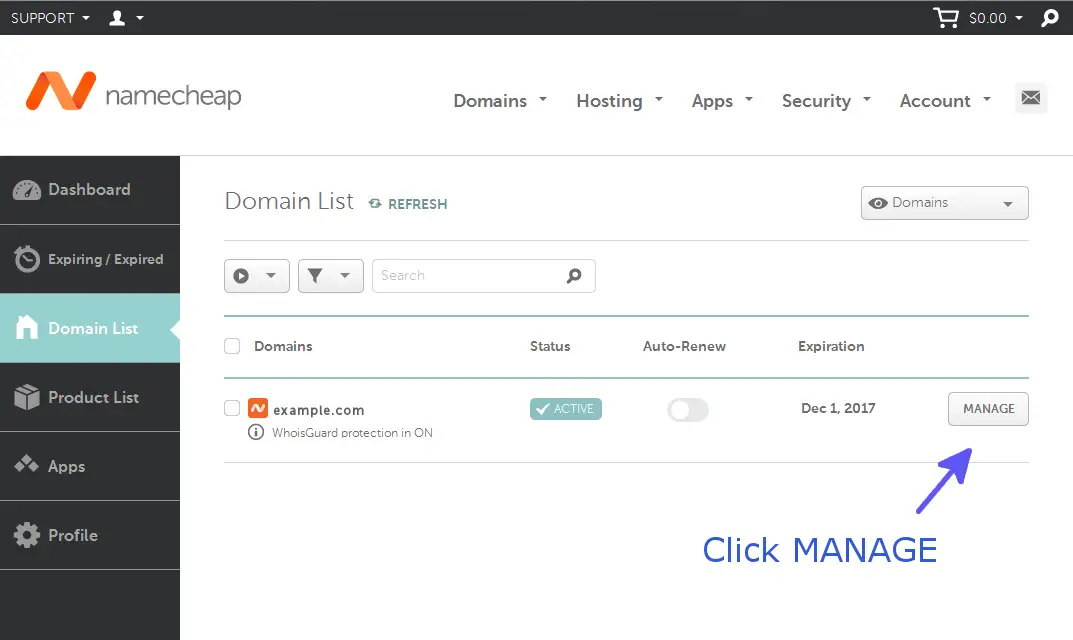
To edit your DNS Host Records, log in to your domain registrar’s dashboard. With Namecheap, you must first find your domain and click the “MANAGE” button. Here’s a screenshot:
Namecheap’s DNS control panel is tucked away in the “Advanced DNS” tab. See below:
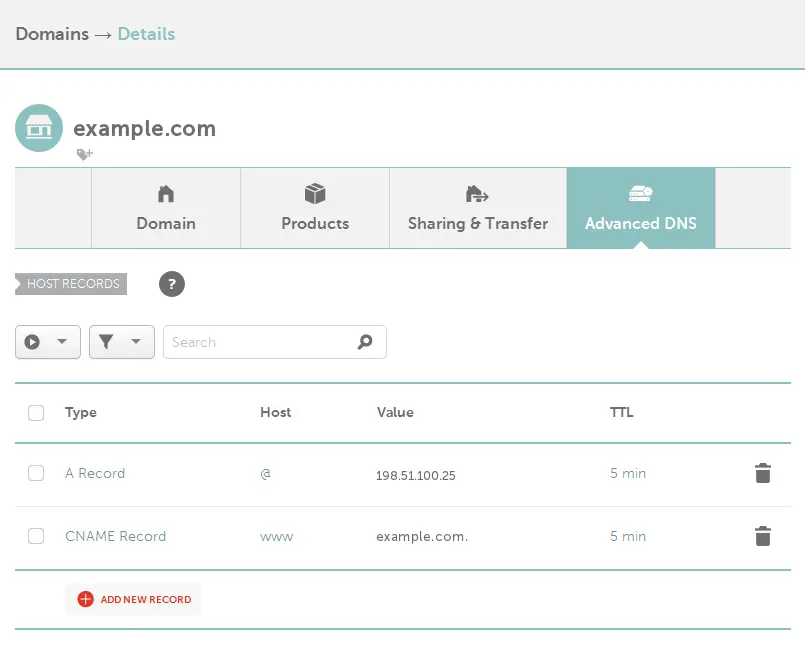
The two examples shown in the image above (A Record and CNAME Record) are all you need to point a domain to an IP address. Let’s look at how we got there.
Step 1: Get your Vultr server IP address
Go to your Vultr dashboard and find your server IP address, shown on the Servers page:
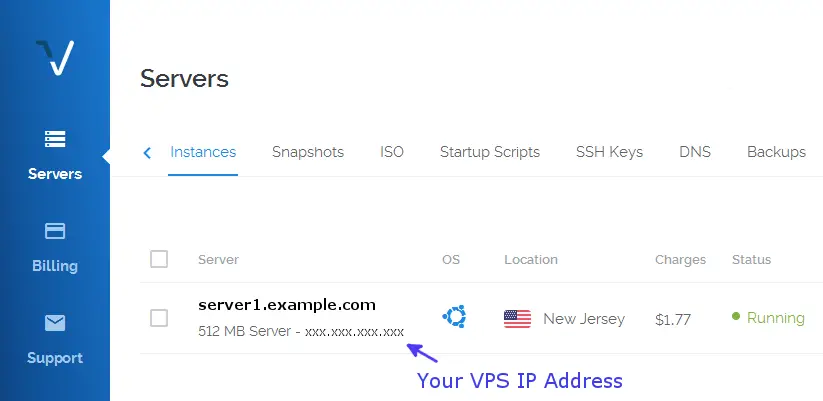
Copy your server’s IP address to the clipboard, and then go to your DNS control panel where you will configure your domain’s DNS records.
Step 2: Set your A Record
A Record stands for “Address Record”, and this is where you will place your server IP address. Add a new Host Record now and select A Record as its type. There are three fields you must fill in:
- Host: Type
@to specify that this record is for the root domainexample.com(not a subdomain). - Value: Paste your server’s IP address here.
- TTL: Keep as default. The Time To Live is how long DNS servers should keep this record in cache, but DNS servers don’t always use this value the same way. Your domain registrar should have an optimized default setting.
Step 3: Set your CNAME Record
Now your domain is pointed at your IP address. But what happens when users type in www.example.com instead of your plain domain name example.com?
Good question, we need to make a DNS rule for redirecting visitors, and this is where CNAME (CANONICAL NAME) comes in handy. A CNAME Record lets you redirect a subdomain, e.g. subdomain.example.com, to your root domain example.com. In other words, the CNAME sets up an alias.
To redirect www.example.com to example.com, add a new DNS host record as type CNAME and enter the following for each field:
- Host: Type
wwwto specify that this record is for the subdomainwww.example.com(not your root domain). - Value: Type
example.com.with an extra full stop at the end to redirect visitors to your root domain. - TTL: You can keep the TTL as default, or set it anywhere from 5 mins to 30 mins.
Wait, why is there a trailing period at the end of example.com.? The reason is simple. Just as www.example.com is a subdomain of your root domain example.com, your root domain is technically a subdomain for the root DNS system.
The trailing period must be added in order to qualify the domain as a FQDN (Fully Qualified Domain Name). Otherwise, your CNAME record won’t be recognized as valid DNS syntax.
Step 4: Test your site
There is a common myth that DNS changes take forever to propagate, but in most cases DNS servers around the world will be updated with your new host records within minutes, if not instantly.
Go to your browser and enter your domain name. The web browser should silently translate “example.com” into your server IP address. And, when you go to “www.example.com”, the browser should redirect to “example.com”.

Tom Davis is a technical contributor at TechWombat. He enjoys writing on IT, open source, electronics, and other geeky arcana. Tom’s always happy to reply to comments and corrections, so be nice and send him your thoughts at tomdavis@techwombat.com or in the comment section below.
Thanks for sharing
Thank you Tom Davis. Your post was exactly what I needed for setting up my website.
How do I setup a vultr VPS to integrate with Cloudflare? I want to be able to know that I can reach my system even if the IP changes
If you haven’t already found a solution, I suggest taking that question to the Cloudflare support forum.
hello, how i point my domain to specifi folder in Vultr VPS? is to say, i have a tomcat server with a site in a folder like http://MyIpAddress:8080/project/mywebsite
Thanks
I don’t have experience with Tomcat, so I can’t give you much in the way of steps to follow. Here is some basic info that might help you figure it out, though.
When you point your domain name to your IP address with an A record, and afterwards you go to your browser and type in your domain name, what happens is that the browser asks the DNS system, “what is the IP address of this domain name, so that I can talk to that specific server machine (VPS)?” Then your browser sends a request to your VPS using its IP address, and it will ask your VPS for content relating to the domain name that you entered. That’s basically all the DNS does, and at this point, it’s up to your VPS to know what files to serve and where on the VPS they are located, so you will have to look into how to configure Tomcat with this in mind.
I think the following links might be of interest in your case:
https://www.tek-tips.com/viewthread.cfm?qid=605298
https://www.digitalocean.com/community/questions/how-to-access-a-java-web-application-by-a-domain-name-using-tomcat-8
https://www.digitalocean.com/community/questions/how-to-tie-domain-name-with-application-running-on-tomcat