
Having your own self-hosted Nextcloud server is extremely convenient – whether you need cloud access to your files for work or you just want Dropbox-like online storage for personal use. In this Vultr tutorial, we’ll walk you through how to install Nextcloud 12 on Debian 9 (Stretch) with almost zero effort using an automated Startup Script.
Take note that Nextcloud 12 is free to download and host on your own server as it is open source software licensed under GNU AGPL v3.0. If you would like to manually set up Nextcloud 12, then see the more advanced step-by-step tutorial: How to Install Nextcloud 12 Server on Debian 9 with HTTPS.
Contents
How to use Vultr Startup Scripts
Vultr provides an easy way to spin up a new VPS with all the necessary software packages installed on first boot through the use of a startup script (or “boot script”). Ordinarily, you’ll need to create the actual script itself, but fortunately you can skip that step by copying and modifying the example Bash script offered below. It might not be suitable for all possible needs, but it’s a great starting point and gets the tedious tasks out of the way so you can jump right in and begin using Nextcloud.
Here is the script we will use. If you are versed in Bash scripting yourself, feel free to read the code comments for hints on what does what. Otherwise, if you choose to use the script as-is, you must customize Options 1 to 6, as explained in the steps you should follow.
#!/bin/bash

# This startup script should be customized by changing each of the six OPTION values listed below. Copy these values to a text file on your PC, as you will use them to complete the Nextcloud installation via your web browser.=

# Bash script provided by TechWombat.com - https://techwombat.com

#------------------------------------------------------
# CUSTOMIZE THESE OPTION VALUES (1 to 6)
#------------------------------------------------------

# OPTION 1: Replace "myuser" with a name for your sudo user.
export SUDO_USER=myuser

# OPTION 2: Replace "nextcloud" with your own Nextcloud database name.
export DB_NAME=nextcloud

# OPTION 3: Replace "nextclouduser" with your own database user name.
export DB_USER=nextclouduser

# OPTION 4: Replace "yourpassword1234" with your own database password.
export DB_PASS=mypassword1234

# OPTION 5: Replace "22" with your preferred SSH port (or leave it as 22).
export SSH_PORT=22

# OPTION 6: Replace "ssh-rsa...AAA" with your own public SSH key.
export SSH_PUB_KEY="ssh-rsa AAA..."

#------------------------------------------------------
# LET THE AUTOMATION BEGIN!
#------------------------------------------------------

# Since this is an automated script with no user input, we will turn off interactive mode.
export DEBIAN_FRONTEND=noninteractive

# Create the .ssh folder for root login and add the public SSH key to the authorized_keys file.
mkdir -p /root/.ssh
chmod 700 /root/.ssh
echo $SSH_PUB_KEY > /root/.ssh/authorized_keys
chmod 600 /root/.ssh/authorized_keys

#------------------------------------------------------
# Update repositories and install basic server software
#------------------------------------------------------

apt update
apt upgrade -y
apt install -y\
  htop\
  vim\
  sudo\
  passwd\
  unzip\
  ssh\
  ufw

#------------------------------------------------------
# Create sudo user for sysadmin and maintenance tasks
#------------------------------------------------------

# Add new user with a home directory and set its default shell as bash.
useradd -m $SUDO_USER -s /bin/bash

# Disable the password and add the user to sudo group.
passwd -d $SUDO_USER
usermod -aG sudo $SUDO_USER

#------------------------------------------------------
# Create .ssh folder for user and add public SSH key
#------------------------------------------------------

mkdir -p /home/$SUDO_USER/.ssh
echo $SSH_PUB_KEY > /home/$SUDO_USER/.ssh/authorized_keys

#------------------------------------------------------
# Lock down permissions on .ssh and authorized_keys
#------------------------------------------------------

chmod 700 /home/$SUDO_USER/.ssh
chmod 600 /home/$SUDO_USER/.ssh/authorized_keys

#------------------------------------------------------
# Make sure that the sudo user owns its home directory
#------------------------------------------------------

chown -R $SUDO_USER:$SUDO_USER /home/$SUDO_USER

#------------------------------------------------------
# SSHD_CONFIG: Improve SSH security
#------------------------------------------------------

# Disable root login by changing "PermitRootLogin yes" to "PermitRootLogin no".
sed -i '/^PermitRootLogin[ \t]\+\w\+$/{ s//PermitRootLogin no/g; }' /etc/ssh/sshd_config

# Make sure that the AuthorizedKeysFile is not commented out.
sed -i 's/#AuthorizedKeysFile/AuthorizedKeysFile/' /etc/ssh/sshd_config

# Disable PasswordAuthentication.
sed -i "s/#PasswordAuthentication yes/PasswordAuthentication no/" /etc/ssh/sshd_config

# Change default port that SSH listens on.
sed -i "s/#Port 22/Port $SSH_PORT/" /etc/ssh/sshd_config

#------------------------------------------------------
# Restart SSH service
#------------------------------------------------------

service ssh restart

#------------------------------------------------------
# Set UFW rules and enable the firewall
#------------------------------------------------------

# Allow HTTP traffic on port 80.
ufw allow 80

# Allow SSH traffic on chosen SSH port.
ufw allow $SSH_PORT
echo "y" | ufw enable

#------------------------------------------------------
# Add LAMP software (Apache2, MySQL, PHP 7.0)
#------------------------------------------------------

apt install -y\
  apache2\
  apache2-utils\
  mysql-server\
  php\
  php7.0-mysql\
  php7.0-xml\
  php7.0-cgi\
  php7.0-mysql\
  php7.0-mbstring\
  php7.0-gd\
  php7.0-curl\
  php7.0-zip\
  libapache2-mod-php7.0

#------------------------------------------------------
# Set up MySQL / MariaDB database for Nextcloud 12
#------------------------------------------------------

# Populate .my.cnf file so that we can log in to MySQL easily.
echo "[client]" > /root/.my.cnf
echo "user=root" >> /root/.my.cnf
echo "password=\"\"" >> /root/.my.cnf

# Secure permissions on .my.cnf.
chmod 0600 /root/.my.cnf

# Create the Nextcloud database with SQL commands.
mysql -e "CREATE DATABASE $DB_NAME;"
mysql -e "CREATE USER '$DB_USER'@'localhost' IDENTIFIED BY '$DB_PASS';"
mysql -e "GRANT ALL ON $DB_NAME.* TO '$DB_USER'@'localhost';"
mysql -e "FLUSH PRIVILEGES;"

#------------------------------------------------------
# Download Nextcloud 12 for Debian 9 Stretch
#------------------------------------------------------

# Move to public /var/www folder.
cd /var/www/

# Download the latest stable Nextcloud 12 release with wget.
wget https://download.nextcloud.com/server/releases/nextcloud-12.0.0.zip

# Unzip the installation files.
unzip nextcloud-12.0.0.zip

# Give apache2 (www-data) ownership of the Nextcloud files.
chown -R www-data:www-data /var/www/

# Remove the default Apache web files and the Nextcloud zip file.
rm -r html
rm nextcloud-12.0.0.zip

#------------------------------------------------------
# Set up VirtualHost for Nextcloud 12
#------------------------------------------------------

# Move to the Apache sites-available configuration folder.
cd /etc/apache2/sites-available

# Add the VirtualHost info to /etc/apache2/sites-available/000-default.conf.
sed -i '/<\/VirtualHost>/i \
\
Options +FollowSymlinks\
AllowOverride All\
\
Dav off\
\
SetEnv HOME /var/www/nextcloud\
SetEnv HTTP_HOME /var/www/nextcloud\
' /etc/apache2/sites-available/000-default.conf

# In 000-default.conf, change the DocumentRoot to /var/www/nextcloud.
sed -i 's|DocumentRoot /var/www/html|DocumentRoot /var/www/nextcloud|g' /etc/apache2/sites-available/000-default.conf

#------------------------------------------------------
# Ensure /var/www permissions are correct
#------------------------------------------------------

# Recursively grant ownership of /var/www to www-data.
chown -R www-data:www-data /var/www/

#------------------------------------------------------
# Enable Apache modules and restart Apache
#------------------------------------------------------

# Use a2enmod to enable the modules required for Nextcloud to work.
a2enmod rewrite headers env dir mime setenvif ssl

# Restart Apache2.
service apache2 restart

#------------------------------------------------------
# FINAL STEP: Go to your browser, type in the server IP
# and hit Enter. Follow instructions on the web browser
# to complete your Nextcloud 12 installation.
#------------------------------------------------------
Step 1: Customize the Startup Script
At the top of the script, there are a total of six options that you must edit. Copy the code into a text editor and change all six option values according to the comments, starting at:
# OPTION 1: Replace "myuser" with a name for your sudo user.
export SUDO_USER=myuser

# OPTION 2: Replace "nextcloud" with your own Nextcloud database name.
export DB_NAME=nextcloud

# OPTION 3: ...
...............
...............
Keep these details handy, as you will need them for the final installation step. Also, make sure that you have the private key for the public SSH key you will enter, or you’ll be locked out when the server boots up.
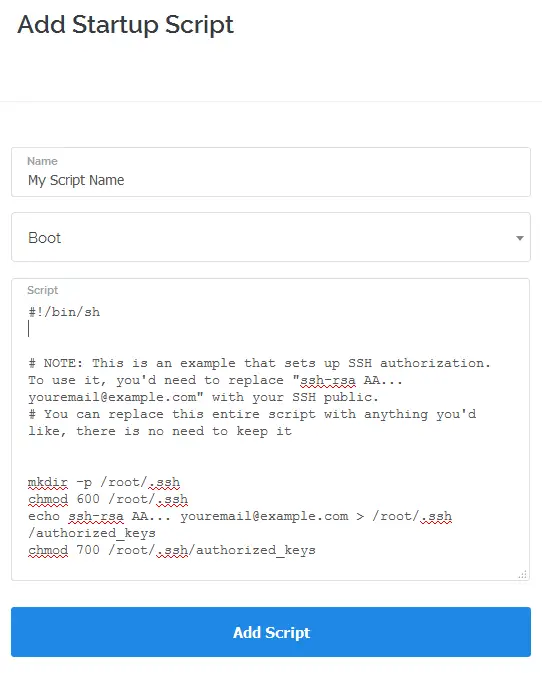
Step 2: Add a new Vultr Startup Script
Go to Startup Scripts in your Vultr dashboard (https://my.vultr.com), then click the Add Startup Script button and give your script a name. For script type, make sure “Boot” is selected.
Copy your edited startup script from above and paste it into the Script field, then click Add Script.
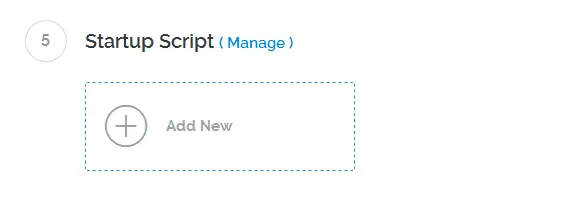
Step 3: Select the Startup Script and OS
Go to the “Deploy New Server” page and choose Debian 9 x64 as the Server Type. Under Startup Script, click Add New and select the Startup Script you just added.
Step 4: Deploy the VPS
Choose an appropriate price plan and any additional settings, then click Deploy Now.
The VPS will boot up and start executing all the tasks specified in the Startup Script. A summary of these tasks include:
- Setting up your main Debian user account with sudo privileges.
- Upgrading Debian 9 (Stretchy) and adding essential packages.
- Configuring SSH with your public key and disabling root login.
- Enabling a basic firewall with UFW (only SSH and HTTP ports allowed).
- Installing a LAMP stack suitable for Nextcloud 12 with Apache, MySQL/MariaDB, and PHP 7.
- Creating and populating the Nextcloud database with the values chosen in Step 1.
- Downloading and unpacking Nextcloud 12 from the latest zip archive.
- Creating an appropriate Apache Virtual Host file and enabling required Apache modules.
The log file for the startup script can be viewed with less by logging into your VPS with SSH and typing:
less /tmp/firstboot.logSecurity consideration: the sudo user has its password disabled. You are advised to set a new password for your user using passwd.
Set a new password for myuser (or whatever you set your username to) by typing:
passwd myuser
Step 5: Install Nextcloud via web browser
Go to your web browser and type in the address for your Vultr VPS (e.g. http://IP_Address). The rest of the Nextcloud installation will take place through the browser.
Here’s a screenshot of the Nextcloud installation splash page.

You will be asked to create a new Nextcloud admin and password. Changing the Data folder is optional, so leave it as default. At the bottom of the installation page, you will need to enter the database credentials that you chose in Step 1. Localhost should stay “localhost”.
When you’re ready to install Nextcloud, click Finish setup. Give it a minute to complete, and you should now be able to log in with your new Nextcloud admin account.
Troubleshooting
Although the provided startup script is designed to set up everything at once, there is a possibility that one or more packages have not been installed correctly because of a Debian update server being offline. If you experience any unexpected errors, or nothing is working, simply destroy your VPS instance and reinstall Nextcloud again on a new instance with the same boot script.
Further steps: security and caching
Your Nextcloud 12 application is now installed and ready to be used, but there are certainly more steps you can take to improve the security and performance of your Nextcloud server. If you’re using Nextcloud for personal use with only a few other users, check out the guide on enabling APCu for a private home server. Security-wise, you should consider adding support for HTTPS with a TLS / SSL certificate, which you can obtain at no cost with Let’s Encrypt.

Tom Davis is a technical contributor at TechWombat. He enjoys writing on IT, open source, electronics, and other geeky arcana. Tom’s always happy to reply to comments and corrections, so be nice and send him your thoughts at tomdavis@techwombat.com or in the comment section below.