Nextcloud 12 Server is an open source cloud storage server app that can be run on Debian 9 with the help of a typical LAMP stack. Featuring an easy-to-use Web GUI, Nextcloud comes with File Sync, Calendar, Contacts, Todos, and other useful cloud-based apps that help to keep your life organized.
In this tutorial, you will learn how to install Nextcloud 12.0.1 on Debian 9 Stretch using a Vultr VPS (or any VPS, really). Your new Nextcloud 12 server will be HTTPS-enabled with TLSv1.2 and HTTP Strict Transport Security (HSTS). As an optional step, we’ll also show you how to add support for HTTP/2.
Contents
- Step 1: Deploy Debian 9 on a new VPS instance
- Step 2: Install essential server packages
- Step 3: Create a new sudo user for SSH access
- Step 4: Harden SSH security
- Step 5: Enable the firewall with UFW
- Step 5: Install the LAMP stack
- Step 6: Set up Nextcloud database with MariaDB / MySQL
- Step 7: Download and extract Nextcloud 12.0.1
- Step 8: Set up the default Apache Virtual Host file
- Step 9: Enable HTTPS
- Step 10: Upgrade HTTP/1.1 to HTTP/2
- Step 11: Configure php.ini to allow large uploads
- Step 12: Complete the Nextcloud installation via web browser
Prerequisites
- You will need a shiny new VPS.
- You must have your own domain name – e.g. example.com – because you are going to get a free SSL certificate from Let’s Encrypt and they do not issue certificates for IP addresses. If you don’t have a domain name, you will have to create your own self-signed SSL/TLS keys, which we won’t be covering in this guide.
- You should know how to log in to a VPS using SSH keys, either with PuTTy (Windows) or the Linux terminal. See this helpful article, “How Do I Generate SSH Keys” for help on creating SSH keys and logging in to a VPS with them.
Step 1: Deploy Debian 9 on a new VPS instance
We are running a Vultr VPS for demo purposes, but you can use DigitalOcean or another VPS host. If you also use Vultr, go to https://my.vultr.com and click the “Deploy New Server” button.
- For Server Type: Choose 64 bit OS > Debian 9 x64.
- For Server Size: Nextcloud can run on a sandbox server with 512MB RAM, however a server with 1024MB RAM or higher is recommended.
Deploy your server now and log in as root using SSH.
Step 2: Install essential server packages
On Debian, you need to install the sudo package before creating a non-root superuser. You should get sudo now, as well as a few essential packages while you’re at it.
Use apt with the -y option to upgrade and install packages without any confirmation prompts:
apt update
apt upgrade -y
Install the following packages:
apt install -y sudo passwd unzip ssh ufw
Step 3: Create a new sudo user for SSH access
We will be using root for the next few commands that follow, but you have to set up a new user with sudo rights and add the SSH keys for this user so you can log in later.
Add a new user (example is <myuser>) and set a password:
adduser <myuser>
Add your user to the sudo group:
usermod -aG sudo <myuser>
Create your user’s .ssh directory to store the public key:
mkdir -p /home/<myuser>/.ssh
Copy your root user’s public SSH key into your user’s .ssh directory:
cp -rf /root/.ssh/* /home/<myuser>/.ssh/
Secure the .ssh folder with read-only permissions:
chmod 700 /home/<myuser>/.ssh
chmod 600 /home/<myuser>/.ssh/authorized_keys
Give your user ownership of its home directory (-R means recursive):
chown -R <myuser>:<myuser> /home/<myuser>
You may now log out and log back in to your VPS as your new sudo user. If you want to learn more about how to use sudo on Debian, read this article.
Step 4: Harden SSH security
Disable root login by changing “PermitRootLogin yes” to “PermitRootLogin no” in /etc/ssh/sshd.
Here is a quick sed command to do that for you:
sudo sed -i '/^PermitRootLogin[ \t]\+\w\+$/{ s//PermitRootLogin no/g; }' /etc/ssh/sshd_config
Disable PasswordAuthentication with this next sed command, which uncomments the line and changes “yes” to “no”:
sudo sed -i "s/#PasswordAuthentication yes/PasswordAuthentication no/" /etc/ssh/sshd_config
Optional: If you also want to change the default SSH port to 4444 or another port (22 is default) then you can use this command:
sudo sed -i "s/#Port 22/Port 4444/" /etc/ssh/sshd_config
To put these changes into effect, type:
sudo service ssh restart
Step 5: Enable the firewall with UFW
You need to allow HTTP traffic on port 80, HTTPS traffic on port 443, and SSH traffic on port 22.
To do so, type:
sudo ufw allow 80
sudo ufw allow 443
sudo ufw allow 22
If you chose a different SSH port than 22, also allow that port by replacing <your_SSH_port> below:
sudo ufw allow <your_SSH_port>
Enable the firewall by typing:
sudo ufw enable
Step 5: Install the LAMP stack
Nextcloud 12 requires Apache, MySQL/MariaDB, and PHP to work.
Install these packages with apt:
sudo apt install -y\
    apache2\
    apache2-utils\
    mysql-server\
    php\
    php7.0-mysql\
    php7.0-xml\
    php7.0-cgi\
    php7.0-mysql\
    php7.0-mbstring\
    php7.0-gd\
    php7.0-curl\
    php7.0-zip\
    libapache2-mod-php7.0
Wait for them all to install, then continue.
Step 6: Set up Nextcloud database with MariaDB / MySQL
Although you installed the mysql-server package, MariaDB 10.1+ was installed because it is the default MySQL server software in Debian 9. For our purposes, the commands for MariaDB are identical to MySQL, so they can be used whether you choose to use MariaDB or MySQL Server.
First off, secure your fresh MariaDB installation with this command (Enter Y at each prompt):
sudo mysql_secure_installation
To log in to the MariaDB client, enter the following and type your MariaDB root password:
sudo mysql -u root -p
Now you can create your Nextcloud database with the following MySQL commands. Keep your database details handy, as you will use them to finish the installation via web browser soon.
Substitute <database_name>, <database_user>, and <database_user_password> with your own values:
CREATE DATABASE <database_name>;
CREATE USER '<database_user>'@'localhost' IDENTIFIED BY '<database_user_password>';
GRANT ALL ON <database_name>.* TO '<database_user>'@'localhost';
FLUSH PRIVILEGES;
quit
Depending on your security needs, you might want to take a few extra steps to harden the default settings. Read this MariaDB security guide for a primer.
Step 7: Download and extract Nextcloud 12.0.1
Move to your web root directory at /var/www:
cd /var/www
Download the Nextcloud 12 server installation zip with wget:
sudo wget https://download.nextcloud.com/server/releases/nextcloud-12.0.1.zip
Unzip the install files:
sudo unzip nextcloud-12.0.1.zip
Remove the zip file:
sudo rm nextcloud-12.0.1.zip
Remove the default html directory (-r means recursive):
sudo rm -r html
Give apache2 (www-data) full ownership of /var/www, which includes the nextcloud directory:
sudo chown -R www-data:www-data /var/www/
Step 8: Set up the default Apache Virtual Host file
Apache comes installed with a default Virtual Host template for HTTP (000-default.conf). We will now replace the contents of 000-default.conf with our own configuration for Nextcloud.
Move to the sites-available config directory:
cd /etc/apache2/sites-available
Open 000-default.conf with vim or nano and delete all the lines. Then, copy the entire Virtual Host config shown below into this file and save it.
Replace <<<example.com>>> with your domain name (appears twice below):
<VirtualHost *:80>
    ServerName <<<example.com>>>
    ServerAdmin admin@<<<example.com>>>
    DocumentRoot /var/www/nextcloud

    ErrorLog ${APACHE_LOG_DIR}/error.log
    CustomLog ${APACHE_LOG_DIR}/access.log combined

    <Directory /var/www/nextcloud>
        Options +FollowSymlinks
        AllowOverride All

        <IfModule mod_dav.c>
            Dav off
        </IfModule>

        SetEnv HOME /var/www/nextcloud
        SetEnv HTTP_HOME /var/www/nextcloud
    </Directory>
</VirtualHost>
Step 9: Enable HTTPS
If you haven’t done so already, you now need to point your domain name at your VPS IP address. To validate the SSL certificate, you have to ensure your domain name is live and resolvable.
Get an SSL certificate using certbot
The Electronic Freedom Foundation (EFF) provides an automated way to retrieve Let’s Encrypt certificates with a Python package called certbot.
Note: A reader has pointed out that some of the steps below might not work for all scenarios. If you run into any issues, see the official Certbot Installation steps and try an alternative method (e.g. using certbot-auto).
Use apt to install certbot:
sudo apt install certbot
Also install python-certbot-apache, which will configure Apache automatically for HTTPS, based on our current 000-default.conf Virtual Host file:
sudo apt install python-certbot-apache
To acquire a new SSL certificate with certbot, type:
sudo certbot --apache
Enter “1” at the prompt shown below:
Which names would you like to activate HTTPS for?
-------------------------------------------------------------------------------
1: example.com
-------------------------------------------------------------------------------
You must provide your email address, and then enter “A” to accept.
Enter ‘2’ (Secure) when prompted at the next step, to enable redirecting HTTP to HTTPS:
Please choose whether HTTPS access is required or optional.
-------------------------------------------------------------------------------
1: Easy - Allow both HTTP and HTTPS access to these sites
2: Secure - Make all requests redirect to secure HTTPS access
-------------------------------------------------------------------------------
Select the appropriate number [1-2] then [enter] (press 'c' to cancel): 2
Your SSL certificates will expire after 90 days, so we’ll set up auto renewal with a cron job.
Open crontab:
sudo crontab -e
At the bottom of the crontab file, enter the following to perform an autorenew check at 3 A.M. every day:
0 3 * * * /usr/bin/certbot renew --quiet
Save and exit crontab. This check will automatically renew any certificate with an upcoming expiration.
Set the HSTS headers
To enforce HSTS headers for Strict Transport Security, we need to edit the 000-default-le-ssl.conf file. Open it now with nano:
sudo nano /etc/apache2/sites-available/000-default-le-ssl.conf
Place the following snippet beneath the line that says “Include /etc/letsencrypt/options-ssl-apache.conf”:
<IfModule mod_headers.c>
    Header always set Strict-Transport-Security "max-age=15768000; preload"
</IfModule>
Hint: max-age=15768000 is 157,668,000 seconds, which sets the HSTS header’s expiry to 5 years.
Enable the Apache headers module:
sudo a2enmod headers
Restart Apache:
sudo service apache2 restart
Step 10: Upgrade HTTP/1.1 to HTTP/2
HTTP/2 became the new HTTP standard in 2015 and it offers several improvements over HTTP/1.1. One advantage of HTTP/2 is that it uses binary instead of textual communication between the server and browser, making data transfer more efficient. It also enables you to serve multiple requests over a single TCP connection with the use of multiplexing.
You can read more about the benefits of HTTP/2 here.
Enabling HTTP/2 in our Nextcloud setup is easy. First, open your SSL Virtual Host file with nano:
sudo nano /etc/apache2/sites-available/000-default-le-ssl.conf
Now insert Protocols h2 http/1.1 on a new line underneath DocumentRoot /var/www/nextcloud.
Here is an example:
<VirtualHost *:443>
    ServerName example.com
    ServerAdmin admin@example.com
    DocumentRoot /var/www/nextcloud
    Protocols h2 http/1.1
    ....
    .... (rest of the config) ....
    ....
</VirtualHost>
Save and close the file.
Now simply enable the Apache module called http2:
sudo a2enmod http2
And restart Apache:
sudo service apache2 restart
Step 11: Configure php.ini to allow large uploads
PHP 7’s maximum upload size is set to a measly 2MB which is not suitable for a cloud storage server.
To set more reasonable PHP upload limits for Nextcloud, open the php.ini file with nano or vim:
sudo nano /etc/php/7.0/apache2/php.ini
In the php.ini file, search for:
post_max_size = 8Mand change 8M to 256M or higher.upload_max_filesize = 2Mand change 2M to a higher value as above.max_file_uploads = 20and change 20 to a higher value like 200.memory_limit = 128Mand change the limit to 256M or 512M if your VPS has the RAM for it.
Save the file and exit.
Restart Apache one last time for good measure:
sudo service apache2 restart
Step 12: Complete the Nextcloud installation via web browser
Type your domain name into your browser and you will be greeted with the Nextcloud web installer page. This is the final step of the installation, and takes only a minute to complete. Here is a screenshot:
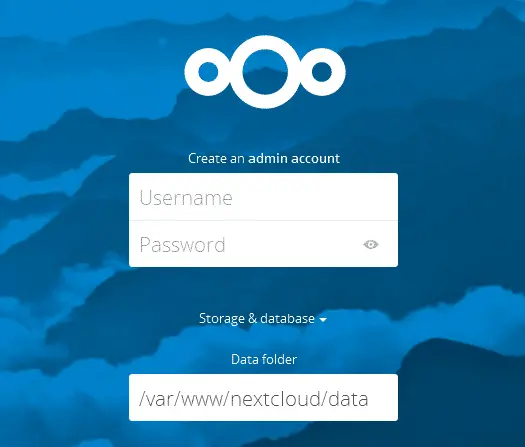
Specify a new Nextcloud admin account, enter your relevant database details, and keep localhost set as “localhost”. Finally, click “Finish setup”.
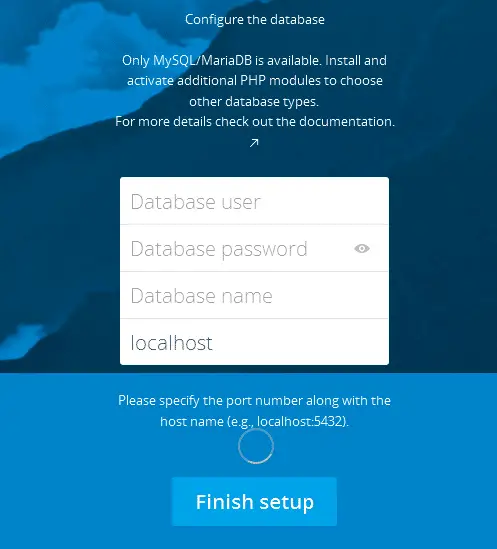
Wait a minute while Nextcloud installs, and then you can log in to the Nextcloud Web GUI admin area.
If you would like to verify that both HTTPS and HTTP/2 are correctly configured on your server, you can use the SSL Server Test at SSL Labs. You should receive an A+ SSL rating.

Tom Davis is a technical contributor at TechWombat. He enjoys writing on IT, open source, electronics, and other geeky arcana. Tom’s always happy to reply to comments and corrections, so be nice and send him your thoughts at tomdavis@techwombat.com or in the comment section below.
Great tutorial! I don’t use vps but was able to get it going on my own machine at home following this guide. Thank you
Awesome tutorial ! Thanks everything working fine (part about certbot has some issues right now but using certbot-auto is ok).
Thanks for the heads up on certbot – I’ll have to revisit that step when I have some free time. Cheers!