In this tutorial, you will learn how to upgrade and configure Apache for HTTP/2 on Ubuntu 16.04 (working for Ubuntu 18.04 and 20.04 as well, according to our friendly commenters). The steps are not complicated, but since you’ll be upgrading the main Apache package you should make a snapshot (or other backup) of your server in case things go pear-shaped.
The default version of Apache that is available in Ubuntu 16.04 doesn’t come with HTTP/2 support – at least, not yet. Luckily, to make the switch from HTTP/1.1 to HTTP/2, you can use an unsupported (by Ubuntu) but stable release of Apache to get it working.
Why HTTP/2? As a protocol, HTTP/2 has a clear and simple purpose: to make the Internet better for everyone. It does this by improving on the technical shortcomings of HTTP/1.1, and it also adds new features like multiplexed TCP streams and Server Push. If you would like to know how exactly HTTP/2 makes the Internet better, then read “http2 explained”, a definitive paper written by Daniel Steinberg of Mozilla.
Contents
Requirements
- A self-managed VPS or dedicated server with Ubuntu 16.04 running Apache 2.4.xx. Psst… Get $100 free credit with Vultr VPS hosting by signing up here (valid for 2024).
- A registered domain name with HTTPS (TLS/SSL). HTTP/2 only works alongside HTTPS because most browsers, including Firefox and Chrome, don’t support HTTP/2 in cleartext (non-TLS) mode.
Step 1: Upgrade Apache from PPA
Let’s assume you installed Apache from the standard stable Ubuntu repository using apt. When you check your version of apache2 by typing:
apache2 -v
… you’ll notice that Apache 2.4.18 is the current default version for Ubuntu 16.04. However, you need Apache 2.4.24 or later for compatibility with HTTP/2.
To get a newer version of Apache, you can use the PPA from Ondřej Surý which includes the latest stable release (Apache 2.4.27 at time of writing). Ondřej is a prominent PHP developer in the Debian community, so this PPA is considered safe.
To add the PPA, type:
sudo add-apt-repository ppa:ondrej/apache2
Or, you can add the PPA manually by inserting these lines into /etc/apt/sources.list:
deb http://ppa.launchpad.net/ondrej/apache2/ubuntu xenial main

deb-src http://ppa.launchpad.net/ondrej/apache2/ubuntu xenial main
Once the PPA is added, update and upgrade Apache:
sudo apt update

sudo apt upgrade
This will update and upgrade apache2 to Apache 2.4.27+.
Step 2: Tell Apache to use PHP FastCGI
You want to make Apache use a compatible PHP implementation by changing mod_php to php-fpm (PHP FastCGI). If your website or app breaks on FastCGI, you can always revert back to mod_php until further troubleshooting.
Install the PHP FastCGI module for PHP 7.0 (replace with “7.1” if desired):
sudo apt install php7.0-fpm
Enable the required modules, proxy_fcgi and setenvif:
sudo a2enmod proxy_fcgi setenvif
Enable php7.0-fpm:
sudo a2enconf php7.0-fpm
Disable the mod_php module:
sudo a2dismod php7.0
Restart Apache:
sudo service apache2 restart
Step 3: Change MPM from “prefork” to “event”
Since the default “prefork” MPM (Multi-Processing Module) is not fully compatible with HTTP/2, you’ll need to change Apache’s current MPM to “event” (or “worker”). This is shown by the error message in Apache versions later than 2.4.27 as – AH10034: The mpm module (prefork.c) is not supported by mod_http2.
Keep in mind that your server requires more horsepower for HTTP/2 than for HTTP/1.1, due to multiplexing and other factors. That said, smaller servers with low traffic may not see much difference in performance.
First, disable the “prefork” MPM:
sudo a2dismod mpm_prefork
Enable the “event” MPM:
sudo a2enmod mpm_event
Restart Apache and PHP 7.0:
sudo service apache2 restart
sudo service php7.0-fpm restart
Step 4: Add a line to your Virtual Host file
Add the following line to your site’s current Virtual Host config file. This can go anywhere between the <VirtualHost>...</VirtualHost> tags. If you want to serve HTTP/2 for all your sites, add this to your global /etc/apache2/apache2.conf file instead of per each individual site’s Virtual Host file.
Protocols h2 h2c http/1.1
Explanation: h2 is TLS-encrypted HTTP/2, h2c is cleartext HTTP/2, and http/1.1 is ordinary HTTP/1.1.
Having http/1.1 at the end of the line provides a fallback to HTTP/1.1, while h2c is not strictly necessary.
Step 5: Enable the mod_http2 Apache module
Now you can enable the http2 module in Apache:
sudo a2enmod http2
Restart Apache:
sudo service apache2 restart
Step 6: Test your Apache server for HTTP/2
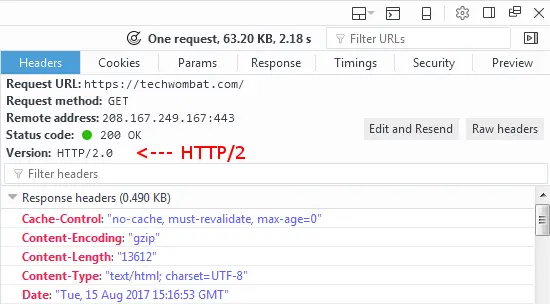
Method 1: “Inspect Element” in browser
Open the developer panel on your web browser by right-clicking anywhere on your website and selecting “Inspect Element” from the context menu.
Go to the Network tab, and then refresh your browser. You should see all the HTTP requests listed. Click on a request to view raw header information. In the header, you should see “HTTP/2.0” or “h2”. Here’s what you will see if it is working correctly:
Method 2: Run an online HTTP/2 Server Test
You can test whether HTTP/2 is working on your server by plugging your domain name into the HTTP/2 Server Test from KeyCDN.
More information on your server can be found by using the SSL Labs Server Test.
Useful resources
- Learn about what you can do with mod_http2 (Apache Docs): https://httpd.apache.org/docs/2.4/mod/mod_http2.html
- Read Apache’s HTTP/2 guide: https://httpd.apache.org/docs/2.4/howto/http2.html
- See this extensive HTTP/2 FAQ: https://http2.pro/doc/Apache

Tom Davis is a technical contributor at TechWombat. He enjoys writing on IT, open source, electronics, and other geeky arcana. Tom’s always happy to reply to comments and corrections, so be nice and send him your thoughts at tomdavis@techwombat.com or in the comment section below.
Still usefull. After a new update of Apache it was disabled, so this how to is very handy.
T H A N K Y O U.
BTW: I’ve been using it for years but this is the first tutorial/person I see using just ‘apt’ inbstead of ‘apt-get’, congrats.
Yeah you’re right boy :))
Awesome, it worked!! on Ubuntu 18.04 LTS with Apache
This guide was super useful, thank you. One point that may help people who encountered the problem I had, where WordPress sites on my server would show 404 errors for all non-homepage content: you have to go to httpd.conf and change the AllowOverride setting back to ‘All’ under the var/www section.
Great tutorial, thank you! 🙂
Great finally figured it out, Thank you for this great tutorial ! 🙂
It is the most comprehensive, *documented/explained* and right guide I’ve ever seen!
Bravo! Many congratulations! Keep up the great work!
Thank you very much!! 😀
Excellent post!!!!
Thank you very much. It worked perfectly 👌
Still working with Ubuntu 18.04. Thanks a lot.
I have to thank you too. This worked for me running Ubuntu 16.04 on a DigitalOcean VPS.
Tried on Ubuntu 20.04, and it worked perfectly. Thank you so much!
As per your guidance, I have Enable HTTP/2 in Apache 2.4 on Ubuntu 16.04 and its really worked thanks.
How to do this on centos 7?